Journey of the Cart

Standard

This blog isn’t about making an ATV cart. It’s about a trampoline legs, a piece of ½” rebar, two 5/8” pieces of pipe, a plastic barrel, some washers, nuts and bolts, a black rubber bungee strap with one hook missing, two metal brackets, a metal bed frame, a can of primer, a can of red paint, two cotter pins, an used 1×12” pine board, two scraps of 2×2” fir and a rusty piece of 1x3x24” iron.

Our camping spot up in the woods is kind of river front property. River front if you don’t count the 200 yards of green way and the small creek you have to cross on the way to the river. The distance becomes somewhat of a journey if you want to spend the afternoon at the river and you have to carry all your stuff that distance. My oldest daughter, her husband and their friends like to camp at the place and have resorted to strapping as much as they can to their ATV and making a trip or two to the river with said stuff. When I saw what they were up to I thought it would be nice to have a cart to load up and haul their stuff to the river. Being a loving and caring father and probaby even more true, I do like to make things and if you have read any of my blogs, you will know I like to make things out of stuff I already have. Except the two tires, which I bought on Amazon for $11. each, I rounded up all the other items from around the farm and in my shop.

I think it’s called making things from scratch. The fun of making something from scratch is that you only know what your end product will be, but how you get there is a journey.

This journey, the Journey of the Cart, started with a frame made from two bottom supports for the legs of a 12’ trampoline. I love trampoline frames because the pipes are so versatile. There are pre-bent pipes, tapered ends of the pipe will slide into the other ends of pipe and some are both bent and have tapered ends. I started the frame with two bottom leg supports. Both ends of the supports are tapered, so I had to cut two 6” pieces of pipe to slide the two ends into to make a rectangular frame that was about 20” wide and 5’ long.

DSCF7752      DSCF7753

I had decided that I was going to us a 55 gallon plastic barrel for the bed of the cart and the 20” wide frame would allow the barrel to lay in the frame and not fall through.

I wanted to give the cart a little more ground clearance so I needed to support the axel below the frame. I scrounged around and scratched my head and scrounged around some more. I finally found two heavy brackets that I had salvaged off some farm equipment and sometime in the past. They could be bolted onto the frame with the two holes already in each of the brackets and to better accommodate the axle I notched them, giving me a place to weld the axle solidly in place. DSCF7754

The barrel, when laid in the frame, sagged through a few inches and sat on and conflicted with the axle. I solved the conflict by bowing the axle down to conform with the barrel before I welded the axle in place. DSCF7757

The wheel barrel wheels had heavy-duty bearings and the hole for the axel was 5/8”. I didn’t have any 5/8” steel rod, but I did have two short pieces of thick wall pipe that were 5/8” and 12” long. The two pipes welded together was right length. To straighten the pipe I slid a ½” piece of rebar in the middle of the pipes before I welded them together.

The wheels were easy to install with a hole through both ends of the axles, a couple of washers and a pair of cotter pins

.DSCF7760

My first attempt at a tongue for the cart was made from pipe with a cross support make from the angle iron cut from a metal bed frame, but after I got it bolted together I wasn’t convinced that the pipe would be strong enough when the cart was carrying a heavy load. I remembered that I had come across a piece of a rusty of 1x3x24” channel iron when I was scrounging around the metal pile. It was very strong and the right length so I pulled it out of the pile and swapped out the pipe with the iron piece.

DSCF7761

The tongue needed a post on the underside of the front end to slip down into the receiver hitch hole on the ATV, so I welded a large bolt on the tongue that would fit. To keep the post from popping out of the receiver hole, I drilled a hole through the bolt that a pin could be inserted through, act as a stop and to the keep the bolt from popping up and out of the hole every time the ATV hit a bump in the trail. To keep the pin from getting lost I attached it to a short chain and tack welded the chain to the tongue.

DSCF7759

A plastic 55 gallon barrel is about 3’ tall and the frame was 5’ long, so that left 2’ of frame unused. I decided that a wood platform for a cooler would be a perfect utilization of the space. I found a piece of 1x12x48” pine board that had been used for a shelf at sometime in the past. It even had a lacquer finish on one side. I cut the board in half and ripped the boards length ways into four 4-3/4” wide boards. I attached the four smaller boards to two 2x2x18” boards. The 2x2s were spaced 18” apart so they would slide down between the cart frame in front of the barrel.

DSCF7774

To make it possible to put stuff in the barrel I cut about a third of the side of the barrel away, leaving the two ends full round.

I wanted to make it easy to remove and install the barrel on the cart. To secure the barrel to the frame I put two large pan head bolts through the bottom of the barrel just below the angle iron that secured the back of the tongue to the frame. The two bolts will keep the front from popping out of the frame. To secure the back, I attached a 12” long black heavy duty rubber bungee to the frame with a bolt. One of the hooks on the ends of the bungee was missing so I pushed a bolt through the hook hole and bolted the bungee to the frame. With a hole drilled in the end of the barrel, the bungee can be stretched up and hooked through the hole securing the back of the barrel down..

DSCF7768   DSCF7769

After I was sure everything was going to work, I wire brushed the frame, cleaned it, primed it and painted it. I was going paint the frame black, but black metal is boring and red is a lot more fun. With the red frame, the white wheels and the blue barrel the cart is quite patriotic.

DSCF7776

I will admit that it takes longer to build a cart, or anything for that matter, without a well thought out plan, but for me, as I get older and have a several hundred projects under my belt, it’s much more fun, challenging and rewarding to just start with an idea and a shop full of stuff.

So back to my statement at the beginning; This blog isn’t about a ATV cart. It’s about a trampoline legs, a piece of ½” rebar, two 5/8” pieces of pipe… It’s about taking what you have and making what you want.

DSCF7775

Anyway…for what it’s worth.


The Things I Do On Rainy Days

Standard

DSCF7557

When it gets cold and the rain comes there are only four things to do; look at my motorcycles, work on my motorcycles, buy more motorcycles, and eat Cheetos. The other day I was looking at my Honda XR650L and thought to myself that it looked like it needed a renovation. I love my XRL and have enjoyed many fun and adventurous miles on it. I would never want it to think that I didn’t love it the way it was, but after riding this last fall with KLRs, BMWs, KTMs, Suzuki dual spots, I realized I was riding the plainest bike of all of them.

When I first got the XRL it was too tall for me. Every time I would put my foot down and the ground sloped down and away, I fell over. It was embarrassing and kind of tough on the bike and ego. So to remedy the situation I bought a lowering kit. When you lower the back you are suppose to lower the front too. I didn’t do that. Lowering the back was enough to keep me from tipping over, but the bike still was a little tallish. As part of the renovation I finally lowered the front too and wow, what a difference. The bike is so much easier to get on and off and it doesn’t seem so top heavy.

The next thing i wanted was a little more power. A few years ago I changed the front sprocket from a 15 tooth to a 14 tooth to give me more low end grunt on the trails, but I wanted still more power and I wanted it for free. One of the things that a gas motor needs to run is oxygen. After a little study I found that some people opened up the air box by removing the top, or snorkel. I did that and the increase in power was noticeable.

The stock bike colors were purple, red and white. That’s right, purple. I quickly painted the purple black.

The bike comes stock with something like a 2.5 gallon tank. When you are up in the woods you like a little more range that 100 miles. I found a 5 gallon tank on Craigslist for cheap and switched tanks. The original tank comes with graphics, very cool graphics. The 5 gallon tank came with nothing. it’s just a big ol’ white plastic tank.

So I thought it was time to dress it up with some color. and when I say “color,” I mean lime green and some more black. I also added some Japanese writing. Guess what it says?

DSCF7688Anyway….for what it’s worth.

MANNY’S MUFFLER

Standard

The Making of a Muffler

j

My grandson refused to learn how to ride his bicycle. When he was two, on his second birthday, he started riding his 49cc ATV by his self, but at six he still hadn’t learned to ride a bike. He clearly had the skill and balance, but he just wouldn’t do it. One day he asked if I would buy him a motorcycle and I told him that he would have to learn to ride a bike before he could learn to ride a motorcycle. So he learned to ride his bike. I looked on craigslist and found a guy that would trade his 1997 Yamaha PW80 for my 1983 Honda XR200. My XR was a nice bike and I went over it, fixing anything I could find wrong with it before I put it up for sale or trade. The guy I bought the PW80 from,Todd, was a nice guy and so I trusted him, but I soon discovered that he wasn’t vigilant with the care and maintenance of his bike, the PW80, and I was foolish enough to believe that, just because he was a nice guy, he had been vigilant. When I got the PW up on my work bench I discovered; the air filter was deteriorated and mostly missing, the chain was caked with hardened oil that I literally had to chip off with a screw driver, the frame was bent and it didn’t have a muffler/silencer.  I’m not convinced that my judgment of Todd wasn’t misplaced, I just believe that he just didn’t have a clue about motorcycle maintenance.

So I went to work and cleaned up the bike and painted it, soaked the chain in oil after I got the solidified oil chipped off and bent the frame straight. I cleaned the carburetor, adjusted the brakes, ordered a filter and did general maintenance on the bike.

Replacing the missing muffler was a little more of a challenge, but a fun challenge. I could have bought a muffler, but that isn’t really my style. Basically, mufflers or silencers attach to the exhaust pipe or fatty and that attaches to the motor. There are three parts to a basic muffler/silencer system; outer metal case and insulation wrapped around a core pipe full of holes. The core pipe that is full of small holes attaches to the exhaust pipe. As the exhaust passes through the perforated pipe, some of the sound escapes out the holes and is muffled in the specially designed insulation that is wrapped around the pipe. The outer metal case holds it all together. Simple. So why are mufflers so expensive? Yeah, they are probably engineered for optimum air-flow so the bike run better or something like that.

The muffler for a PW80 is small, about 11” long and maybe as big around as a 1-1/2” pipe. The after market mufflers are a little larger. I had plenty ¾” pipe that I could make the core pipe out of. and I had some muffler insulation, so all I needed then was a outer case. Sometimes when I need to make something and am not sure what to make it out of I walk around my shop trying to get an idea by looking at stuff I already have. What I found was a 10” tall rattle paint can that was nearly empty. The rattle can had a cool shape at the top and was very shiny when the label is removed. With the can, I had all the basic parts I needed.

DSCF7486

DSCF7495

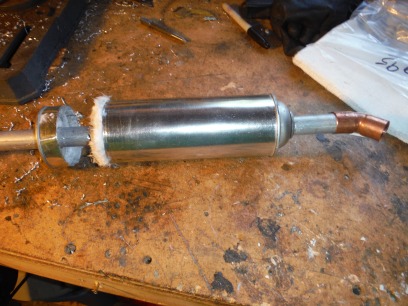
I released the pressure out of it, drilled a ¾” hole through the top and bottom and cut the bottom off the can. After I drilled the core pipe full of small holes I wrapped it in the insulation and slipped it all into the rattle can, re-attached the bottom of the can with a pipe clamp by cutting some small slits in the bottom’s walls so it would slip over the body of the can.

DSCF7496  DSCF7487

Because the new “after market” muffler was bigger than the original muffler, I used some ¾” copper pipe fittings, soldered together, to attach it to the exhaust pipe and snake it around the frame and into a good location under the back fender.

20141020_144206

I hung the new muffler from the frame with some metal plumbers strap and added some metal screws here and there to stabilize it. Without the muffler the two stroke motor sounded like the rapid fire of a gun, pop, pop, pop. Even with a muffler a two stroke motor is loud, but the homemade muffler cut the noise at least in half and in my humble opinion, it looks pretty cool too.

20141020_13493420141020_153645

MAKING ROOM FOR THE WIFE

Standard

DSCF7322

When my wife committed to joining me on our riding groups’ annual adventure to Baker City Oregon, I realized that our bike was not set up or rated to carry us and all the personal items that would be required to keep us in clean clothes and beautified for a week.

Our Suzuki Volusia 800cc has a Gross Vehicle Weight Rating, GVWR, of about 950 lbs. The bike alone weights 590lbs. This means that my wife and our luggage, tools and miscellaneous items would have to weight 90 lbs. My wife alone weighs close to 90lbs. (You’re welcome babe). I weigh…do the math. Well you get the idea, we would be way over the GVWR. We got out our “Motorcycle Trip Packing List” (see my blog, “Motorcycle Packing List”) and started crossing things off the list that we could live without. When all was said and done we got our stack of essentials to fit into two small pieces of luggage, airplane carry-on style, and our biggest motorcycle trunk. In the past, when I used the Volusia for a trip I would just strap a bag on the passenger seat, cram a bunch of stuff in the hard shell saddlebags and be off. The problem now was that our Volusia was not set up to carry two pieces of luggage, my wife, and I. My V-strom is setup for exactly that scenario, (see my blog, “Panniers Made From Scratch”) but the V-strom isn’t nearly as comfortable as the Volusia to ride, it has Corbin seats.

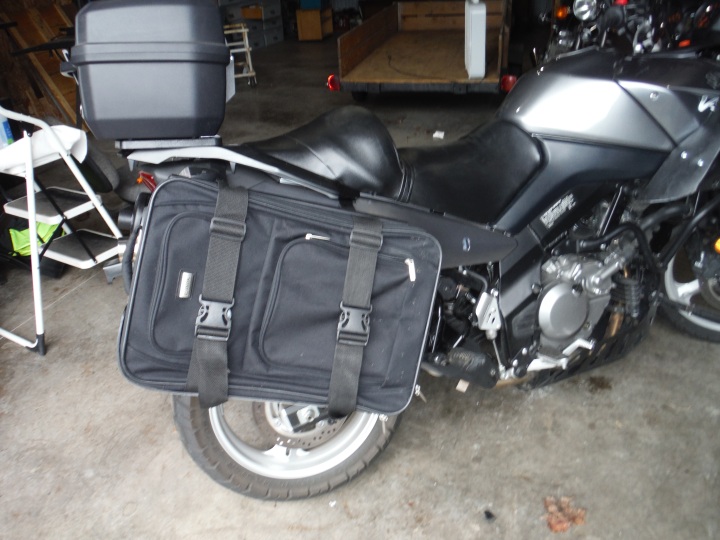
For the next couple of days I scratched my head and tried to figure out how I was going remove the hard shell saddlebags and replace them with two pieces of carry-on luggage. I finally concluded that I would have to make another set of plastic panniers for the Volusia, exactly like those I made for my V-strom. That’s right, I said “exactly” like those for the V-strom. The panniers for the V-strom attach to the bike using a metal frame work that I designed and made. The Volusia didn’t have that same frame work, but it did have the saddlebag supports and the mounting studs that attach the saddlebags to the bike. Retro-fitting the panniers to the Volusia was as easy as drilling two holes in the back of the plastic panniers so they would slip onto the studs and clip in place just like the saddlebags. To make them extra secure and for added support I added a couple of straps. Now granted, it didn’t look “Harley Cool,” but it worked great.

DSCF7382

Showing plastic panniers on Volusia with studs showing and extra straps for support.

DSCF7373

Showing luggage in place in plastic panniers and covered with bright rain proof bags.

I knew that once we got to Baker City we would be removing the plastic panniers and luggage, which presented two more issues. First, with them removed, the bike is left with two large and ugly, metal ell brackets sticking out on both sides of the bike where the bags mount.

DSCF7383

Showing ugly metal support brackets for saddlebags

And second, the trunk wouldn’t be large enough to pack all the stuff we would need for the long day trips we would be taking from Baker City. My first thought was to pack the saddlebags full of clothes and pack the packed saddlebags in the luggage, but they were too big and too heavy.

When I first started riding dual sport I wanted some small saddle bags I could attach to my Honda XR650L to carry essentials, like tools, rain gear, water and power bars. I didn’t want to spend a lot of money on brand named soft saddlebags, so I would stop by Goodwill every now and then to see if I could find pairs of backpacks, duffel bags or small soft sided luggage bags that were identical or very similar in size and appearance. Lucky enough, I was able to collect a few pairs of bags that looked alike or were exactly alike. I found two identical Goodwill bags in our motorcycle stall storage cabinet that would be a good size for day ride purposes. I could have just strapped them on the bike like saddlebags, but after modifying my plastic panniers the idea of making simple plastic supports that would attach just like the saddlebags and panniers seemed like the best plan.

I took one of the plastic barrels that I had and cut off two rectangles that were the same width as the small bags, 11.5”, and that were the same length in height + depth as the bags, 17”. Using a propane torch I heated and bent the plastic rectangles into two large ell shaped brackets. I drilled holes in the brackets to match the mounting studs on the bike so they too would slip onto the studs and clip in place.

Both bags had large open pockets on the back of them. I cut the pockets open along the bottom and reinforced the cut material with Gorilla Duct Tape, love the stuff. Next I slipped the bracket up through the open bottom of the pocket. The modified pocket held the bag to the bracket, the bag was supported by the bottom of the plastic ell and the bracket clipped easily to the motorcycle saddlebag studs.

DSCF7378

Showing plastic ell bracket and small bag.

DSCF7379

Showing ell bracket inserted through cut open back pocket.

DSCF7385

showing small bag mounted on the bike

The small bags were lightweight, could easily be packed with clothes and packed nicely into our luggage. They were large enough to carry what we needed for day trips and were even rain resistant. They did look a little redneck and defiantly not “Harley Cool”, but I’m not what you would call “cool.”

Anyway…for what it’s worth.

The Transformer Motorcycle

Standard

DSCF7198


When I bought this 1981 Suzuki GS850 I was tempted to just polish it up, get it running well and sell. Most of the time though, I can’t leave well enough alone. After considerable contemplating I decided to make the bike a “Transformer.” Transforming from the stock bike to a bobber.

Bobber motorcycles are very popular, but to me, Bobbers are limiting. They’re cool, but limiting when it comes to riding for miles and many hours. What I wanted to do is create a bike that could go from stock to bobber with a bunch of variations in between and back to stock. When you buy a bike you pretty much get what you bought, cruiser, dual sport, café racer, bobber, crotch rocket…, but why not have a bike that can be changed to fit your need or mood.

When bike makers see this blog I’m sure they all will rush to make a Transformer bike.

GE DIGITAL CAMERA


Here is what I did to make the bike into the Transformer; First I wanted to make a bobber style seat that would offer some comfort and would easily be installed and removed using the bike’s current brackets. This modification was perhaps the most time consuming. Bobber seats are pretty minimal, but I wanted something that would offer some comfort and yet look minimal. I’ve seen bobber seats that were metal farm tractor seats and though they look cool, I don’t think you’d want to ride all day on one.

I chose to make the seat out of plastic from a plastic barrel. I did this for two reasons; One, I like working with plastic barrels and second, I felt that plastic would offer some flex when sitting on it for long periods. To get the style I wanted, I cut the seat from the bottom of the barrel, leaving a couple of inches of the side of the barrel attached at the back of the seal. This would give the seat a raised back edge so it would look like just a flat board seat and the back raised edge would give the seat some flex. I covered the seat with first a layer of firm rubber yoga mat, then 1.5 inches of memory foam and covered it with black leather looking vinyl. The final product looks pretty good and is pretty butt form fitting.

DSCF6995

DSCF7024


The original seat clips under two brackets at the front by the tank and lockded into another bracket at the back over the back fender. I wanted to use those same brackets for the new seat so I made a base for the seat, out of plastic.This gave me a base of attach the seat to.

DSCF6986

DSCF6999

To attach the new seat to the bike I wanted to make it attach just like the original seat. At the front of the plastic base I welded together a bracket similar to the one on the original seat and attached it to the front of the plastic base with screws.

DSCF6998

The back latch was a little more complicated, but simple in nature. I made a slot in the seat base that would slip over the back metal bracket on the bike. So the plastic base would be secured down, I made a spring loaded latch, out of more plastic, a spring and small screw driver that I removed the handle from and bent the end so it would be easy to grab. This picture shows the base clipped to the bike’s bracket with the spring loaded screw driver. The other piece of plastic is the top piece, shown upside down, that holds the spring and screw driver in place.

  DSCF7022

To install the seat base on the bike you simply slip the front into the front bracket, pull back the spring loaded latch, slip the slotted base onto the back bracket, release the spring loaded screw driver and lock it in place. The seat is bolted to the base using two small bolts. To make sure the seat unit doesn’t flex too far down, I installed a 2” x 8” plastic pipe across the frame of the bike under the seat. The pipe keeps the seat off the battery and wiring and adds to the flexing and comfort of the seat.

With the new seat on, the bike was starting to take on a bobber appearance, but I felt like if the back was lowered a little it would look better. Some bobber builders remove the back shocks and replace them with metal pipes that are shorter than the shocks. This lowers the bike, but offers no suspension. They call this a “Hard-tail,” because it’s hard, no suspension. I call it a “butt buster” or “back breaker.” I wanted to keep the shocks so the bike could be ridden with more comfort. If you’ve read any of my past motorcycle blogs you know I’m all about a comfortable ride.

The tops of the springs are attached to a threaded post, one on each side of the back fender, that are welded to the bike’s frame. The shocks slip onto the posts and are secured with a nut. To lower the back and keep the shocks I added two more threaded posts, one on each side, but I moved them up on the frame 1.5” and back slightly. To add the new posts I drilled a hole through the bike’s tubular frame, one on each side. I bought two bolts that would fit through the tops of the springs, cut the heads off the bolts and slipped them through the holes. I then welded the bolts in place on both sides of the tubular frame. Because the shocks are still installed the bike is called a “Soft-tail.” I call it “Heavenly.”

With the new bobber style seat and with the back lowered, the bike looked a little more bobberish, but not bobbered enough. Most bobbers have a raised gas tank. Some even have very small tanks that are almost head height. I decided the bike would look more “bobber” if the tank was raised up at the front. To accomplish this I again wanted to keep the original tank and attachment brackets. The front of the tank attaches to the bike with two slotted brackets on the under side of the tank that slip onto two “ears” attached to the bikes tubular frame. I raise the front of the tank by duplicating the two ears and welded them to a bracket that would straddle the bike’s tubular frame and slip onto the original “ears.” That worked and raises the front of the tank 2”.

DSCF7072

The signal lights on the bike are very large and kind of ugly. The lights, one on each side of the front and one on each side of the back, are attached to the bike on short tubes that stick out from the bike. I thought about replacing them with smaller L.E.D. lights, but I’ve ridden with guys that have converted to smaller lights and I find them hard to see. It’s my opinion that when riding a motorcycle you don’t want any light on the bike that is hard to see. I scratched my head for a while and decided to keep the signal light, but droop them by cutting the base of the of the tubes, where they attach to the bike, at an angle so the lights sloped slightly down giving them a drooped look.

DSCF7141

The stock tail light is huge. The light itself is large and square and the metal base that the light is attached to is kind of massive and not in keeping with the bobber simple look. I decided that when the bike is transformed into the bobber style, a round tail light with a small bracket would look better. You can buy many different sizes from your local automotive store. I chose one that I thought would be easy to see and look right for a bobber. (The white towel is to hide the license plate for whatever reason people do that.)

The handlebars that came with the bike may not have been stock. They were the style that raise up and swoop back and down. They were kind of funky looking and hurt my wrists after about five minutes of riding. I prefer something shorter and wider with only a sight pull back. The bars seemed useless to me so I cut them up and welded them back together in a more suitable style for my purpose. The result was handlebars that are more comfortable and better looking.

The thing about the bobber style is that most bobbers make you sit on a lowered bike with a flat seat and with the original foot shifter and brake in the original places. If you are taller, like me, this puts your knees in a very bent position. When I was younger that knee bent position wouldn’t have bothered me as much. Now that I’m older, lets say 40ish, bending my knees at such a squatted position is a deal killer. And knee killer. To remedy this uncomfortable riding position I made a forward shifter and forward brake mechanisms called forward controls. I wanted to keep the original shifter and foot brake lever in tact, so that the bike could be converted back to the original style. I did some shopping on Ebay and found replacements for a very reasonable price, like $36. for both with free shipping. I took the Ebay levers and cut them in-two, made brackets that attach to the frame in front of the motor, added pegs, rods, more brackets, etc… and I had forward controls that allowed me to stretch my legs forward, making the ride more comfortable.

DSCF7068

With all these modifications the bike can be set up in about 36 different configurations. You can change the seat or not, keep the front fender, or not, change the break light, or not, use forward controls, or not… raise the tank, or not, lower the back, or not, well you get the idea.

The last step was to paint the bike. A lot of people like “blacked out” bikes. I like them, but I wanted to add some bright highlights. I chose orange to give the bike some snap, some pop, some eye catchiness. To black out the bike, I cleaned the motor and sprayed it and the exhaust with a heat resistant paint. The rest of bike I painted first with black spray on truck bed coating, added the orange highlights and then clear coated it. I’m sure everyone will have their own opinion about how the bike looks, but I’m pleased with the results.

DSCF7202

DSCF7201DSCF7199

This bike is my second winter project this year. The idea was to buy it, fix it, sell it and make a little cash. With this bike I made so many modifications that I told my wife that “I should hold onto it for a few months and ride it to make sure all the bugs are worked out and that it’s running right,” And that’s true, but this bike is a kick in the pants to ride and that’s true too.

There is a lot of parts to this project and each part could have been a blog in it’s self. If you decide to attempt any of these customization and need more information, please feel free to email me or leave your questions in the comments.

Anyway… for what it’s worth.


Highway Pegs for Adventure Bikes

Standard

DSCF7127

One of the best additions I’ve made to my V-strom is the highway or forward pegs. Having the option of stretching my legs forward and resting them on foot pegs is a real relief when I’ve been riding for hours. Making the forward pegs is also one of the more difficult additions I’ve made. In all honesty I have to admit that the project of making the pegs was made difficult by the fact that I am a cheap bastard and instead of buying square metal tubing I used what I had, round pipe. To make the forward pegs for an “Adventure Bike,” I had to make them hinged so that they would fold up and out of the way in rough riding conditions and so they could easily fold back down when riding on the highways. To make them hinge with round pipe I had to heat the ends of the pipe until it was red hot and then hammer the round pipe into perfectly square ends. It gets even more complicated and difficult when one of the… well never mind, let me just tell you how to do this the easy way.

First you have to have a skid plate on your bike. For my V-strom I bought a skid plate. I had all kinds of ideas of how to make a skid plate, but I got such a great deal on the bike that I convinced myself that I could afford to buy the plate. Without a skid plate you might be able to attach to your crash bars, but you’ll have to buy crash bars. The forward pegs are three separate pieces, a long bar that bolts across the front of the skid plate and two shorter bars that are the foot pegs. The two foot pegs attach to the long bar at both ends with a single bolt that acts as your hinge pin. For my bike the long bar is 16” and the foot pegs are 6.5”. I’ve been pretty happy with those lengths, but you may want to make adjustments for your particular bike or riding style.

To make them out of square tubing you would cut the long bar at 16″, but leave a bottom tongue on both ends sticking out about 1″. The pegs are 6.5″ with the bottom corner rounded so it will hinge up and not drag the bottom corner. Cut four 2″ ears out of flat stock and weld them to the ends of the main bar with 1″ of the ears sticking out past the main bar. The ears will be welded to the tongue and main bar, one on each side. The other option is to buy foot pegs and bolt them to the main bar, but what fun would that be?

DSCF7136DSCF7138

I bolted my long bar to my skid plate with two “U” bolts. To make the foot pegs less slippery and to dress up the pegs I used a pair of rubber handlebar grips and slid them onto the pegs. They worked pretty well, but I failed to glue them on and they had a tendency to slid outward. On a trip to Glacier I lost one outside White Salmon, so I went into a hardware store found a heavy duty black rubber hose that would slide tightly onto the pegs and I’ve use that since. In my shop I found a couple of plastic caps off some kind of aerosal spray cans, probably brake cleaner, to cap the ends of the rubber hose to make the ends of the pegs look a little more finished.

DSCF7137

Like I said, one of the best addition I’ve make to my V-strom. I’m not young, have a little arthritis in both knees and being able to stretch out my legs is so nice.

IMAG0061

Anyway…for what it’s worth.

Wind Guards for V-strom

Standard

IMAG0197

Showing my Better Motorcycle Windshield and my Wind Guards.

After I made my  “Better Motorcycle Windshield,” which worked great and eliminated the head buffing, I realized that the only other big source of wind hitting me was coming from the tank area. I knew the usual solution was to put on fork wind deflectors. But I didn’t like the idea of something attached to my forks on a bike that I rode in rough conditions like back roads, forest service roads and on occasion, a narrow trail. I felt like they would be susceptible to damage from bushes, branches and if someone else was riding it, crashes. After some thought, I decided that I wanted something that would mount on the bike nearer to my legs, offering some protection to my legs and at the same time diverting the air flow coming from below and up around my bike’s tank.

What I did was simple and works great. Using plastic from a 55 gallon plastic barrel, I cut two wind guards following a pattern that I had developed from cardboard. I patterned the cardboard to match the contour of my bike, without touching or rubbing on my bike.

DSCN0428

The mounting brackets were easy to make from the plastic of the barrel. I probably could have bought and used two ell brackets and two conduit clamps, but I didn’t have the right size on hand and the plastic offers more flexibility.

DSCF7090

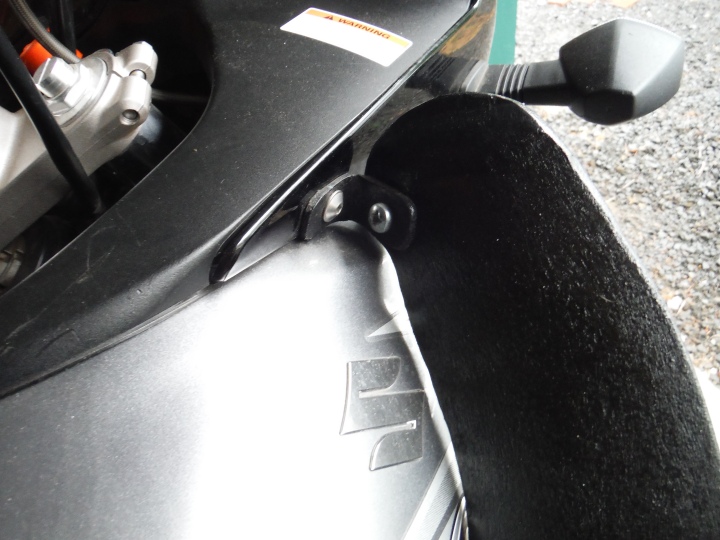
My wind guards mount to my crash bars with the “U” clamps and to the fairing using the ell brackets and a screw into the wind guard. I used a factory screw that holds the bike’s fairing in place. It was located in a perfect place for my purposes.

DSCF7089

 I painted them with truck bed coating that you buy in a rattle can and the black matches my bike great.

They work great! With my windshield modification and the lower wind guards I ride in a very wind free environment. Now the only time I get hit with wind is if the wind is blowing in from the side.

I was afraid that the deflectors would make my bike look too redneck, but I have gotten a lot of compliments on them and most people think that they are stock.

DSCF7087

Anyway…for what it’s worth.

Motorcycle Helmet Trunk

Standard

DSCF7012

There have been a couple of times when I have purchased a motorcycle from a private party and the seller has thrown in an old helmet to boot. Helmets have a half life of only a few years and the older they get, the more likely they will not protect your head in a crash. So when I get an old helmet, of course, I… use them. I use them until I can purchase a new helmet.  Then comes the question of what to do with the old helmet? I have held on to a couple of full face helmets with the idea that I would convert them into a motorcycle trunk. I know what you are thinking, “a helmet isn’t going to hold enough stuff to be of any use.” There is where you are wrong. I did a “stuff-it-full” test and found that a full face helmet will hold three full sized bath towels! I estimate that a person could carry in the full face helmet trunk; a sweat shirt, a pair of gloves, some odds and end tools, water bottle, power bar and a pair of sunglasses.

Today I was working on my GS 850 Suzuki bobber project, but wanted to take some time and consider a few things I was going change, so I decided to work on my helmet trunk idea. Choosing the best one of the two useless full face helmets kicking around in “Motorcycle Stable,” I removed the inside padding and foam. The padding just snaps in and came out very easily, but I had to break the foam loose from the shell with a chisel.

DSCF7003

To make the helmet into a trunk I figured it would have to have a bottom plate in it so my stuff wouldn’t fall through luggage rack onto the road. There are a couple things you could use for a bottom plate, wood, metal, or plastic. I used plastic from a 55 gallon barrel. Wood would have been much easier, but I’m a plastic barrel guy. The top of the barrel is the thickest plastic, so that’s where I cut out the bottom plate. Just set the helmet on the top of the barrel and trace around it.

Most helmets taper inward at the bottom opening.  I cut the plastic slightly larger than the opening, so when I put the bottom plate into the helmet and pushed it down, it would be too large to pass through the narrower bottom opening, It took several trips to the grinder to get the bottom plate just the right size. Once I was satisfied with the fit, I pushed the plate down to the bottom of the helmet shell and stuffed the shell full of towels to hold the plate in place. Using a good epoxy glue, I secured the plate to the helmet shell from the under side and then from the inside after I removed the towels.

The top of the barrel where I cut the plate is slightly concave. When I attached the plastic plate to the helmet, I put the curve so it was bowed up into the shell. I did this because motorcycle trunks are usually secured to the luggage rack with a couple of bolts, a bracket with two holes in it and two nuts. With the bow up, when the nuts were tightened they will pull that bow down, putting constant presser on the nuts so they would be less likely to come loose.

To mount the helmet trunk to the luggage rack, drill two holes through the bottom plate about 4″ apart or so the holes with the bolts through them will fit though the luggage rack with at least two rack bars between the bolts. Drill two holes in a metal bar that match the holes in the truck bottom plate. Put the bracket with two corresponding holes under the luggage rack, drop the bolts through the plate, between the bars on the luggage rack and through the bracket holes and secure with two nuts.

DSCF7010

The helmet was pretty ugly and beat up, but some sanding and a coat of black spray in bed liner dressed it up. I sprayed the face shield too so no one can see my stuff in the helmet trunk. I padded the bottom of the trunk with a cut to shape piece of rubber yoga mat that I picked up at Goodwill one day. So that’s pretty much it. I now have a trunk that I can easily attach to any luggage rack, carry my stuff in and gave an old helmet a second useful life.

DSCF7017

Anyway… for what it’s worth.

PANNIERS MADE FROM SCRATCH

Standard

Luggage Racks For my V-strom

Photo389

Like most people, my life has been made easier by computers and yes, better. In my job as a home inspector, WIN Home Inspection Salem, a computer saves me time and corrects my terrible spelling. A computer provides most of our TV viewing pleasure and keeps me in touch with friends and family. I know for a fact that I would have never written a dozen books if I hadn’t had a laptop computer. Most of my life of being a do it yourselfer has been spent in trial and error. I have spent many hours and lots of money making mistakes because I didn’t have the knowledge to do it right the first time. Now I just go to my computer and Google how to do what ever it is I want to do and I can find it on Youtube. Exploring the internet with my computer has kept me learning and growing like nothing else could have done. And even though I curse them sometimes, a computer has opened the world to me and enhanced my life. God bless you mister or misses computer inventor person(s).

Next to the computer, used plastic 55 gallon barrels would have to be #2 in making my live easier.

After I realized how much I enjoyed dual sport motorcycle riding on my Honda XR650L, I decided that I needed an adventure bike. An adventure bike is a step up from a typical dual sport in that it is comfortable enough to ride long distances on the highways, but when you see a dirt or gravel road that looks interesting, off you go. After a lot of study I decided that the Suzuki V-strom 650DR was the ideal bike for me. I couldn’t really justify the expense of an $5000-$7000 bike. Since I like to work on motorcycles I decided that if I could find a wrecked bike that was mechanically sound I could probably fix it up and make it, at the very least, interesting looking. I had just published a book, The Reincarnation of Joe Rocket. In the book the main character had fallen on hard times and his buddy, Two Stroke, bought him a V-strom that had been wrecked. He spent a couple weeks fixing it up and then rode it from Washington State to Maine. It occurred to me that if Joe Rocket could fix one up, I could too. I put an ad on Craigslist and a week later a guy emailed me saying he had a totaled V-strom that he wanted to sell. The bike was a 2010 with 4500 miles on it. Long story short, the bike looked brand new, except for a broken left front turn light and the shifter lever. There were also a few small scratches that I would have never noticed if he hadn’t pointed them out to me. The guy had been rear ended, tapped, at a stop sign and tipped the bike over. Since the bike was virtually new, he wanted everything with even a minor scratch replaced. By the time the insurance company added it all up, the bike was totaled.  I bought it for half the price of a new one and within thirty minutes I had fixed the turn signal light and shifter. So much for a fixer upper project. I love this bike.

I had sold my cruiser, 2002 Honda VTX 1800, the previous winter, so the Vee was going to be my all around bike. I would use for long weekend dual sport trips and my week long road trips. For long trips I needed some kind of  saddlebags, or for a adventure bike like the V-strom, panniers. Panniers are usually aluminum boxes that mount to each side of the back fender area. They are made of aluminum to be almost indestructible and watertight. I never liked the idea of big metal boxes mounted to the back of my motorcycle. I guess I have had too many close encounters with trees and boulders and knew I would end up tearing them off my bike or denting them beyond repair. As I searched the web for something I thought would work for me, I found nothing I liked or could afford. I kept thinking, why don’t they make a flexible plastic holder that you can just slip your luggage onto? Then I though, “Hey, I can make that!”

I needed to make a rack that would withstand crashes and that I could mount my plastic luggage holders onto. During searches on the web I had seen many different racks that would mount on my V-strom, but I felt I could do better or at least, as well. I made a rough sketch of what I wanted, found a 10’X3/4” piece of conduit in my shop, bought some 1/8”X 1” metal flat stock at ACE, got out my conduit bender, fired up the welder and went to work.

Showing complete rack with my stovepipe tool box attached.

Showing complete rack with my stovepipe tool box attached.

The first thing I did was bend the conduit so it would attach to the passenger foot peg frame bracket on one side, bend around the back of the bike just under the tail light and attach to the other passenger peg frame bracket. I carefully flattened the ends of the conduit and drill holes for bolts through the flattened part. The frame brackets for the passenger foot pegs on the Vee are large and there was plenty of room to drill a hole in the bracket to accommodate the conduit, bolt and nut.

DSCF6908

The Vee comes stock with a substantial back rack that sits over the back fender. It’s bolted on in four places, two bolts attach back rack and two more bolts forward about mid seat. In my opinion, it is always a good idea to use the factory bolts and brackets when ever possible to attach something not stock to your bike.

I cut and bent to fit, two pieces of flat metal stock that would bolt under the back rack front brackets and reach down to the conduit. For the back support, I cut and bent one piece of flat stock that ran from the conduit on once side, up and under the back rack and down to the conduit on the other side. Because of where I had to run the flat stock under the back rack, the bolts for the rack didn’t line up with the flat stock. To make the connection to the bolts I welded two small ears to the flat stock that would reach the two bolts.

Showing rack bolted under the bike's rear rack at mid-seat.

Showing rack bolted under the bike’s rear rack at mid-seat.

Showing the two ears I welded on to fit in the two back holes of the bike's rear rack.

Showing the two ears I welded on to fit in the two back holes of the bike’s rear rack.

The next step was to cut two short pieces of flat stock that would attach horizontally between the two vertical flat stock on each side and would give me something to hang my plastic luggage racks on. Once everything was cut, bent and fitted, I welded it all together and sprayed it with black spray in bed liner.

Now with the rack made and mounted, I needed to make luggage racks. After drawing some sketches of what might work, I made a pattern out of cardboard. I had in mind that I was going to use 20” carry-on luggage to fit in the luggage racks.

Now what I needed was a big flat piece of plastic. Here is something that you might not know. If you cut the top and bottom off a plastic 55 gallon barrel, then cut it down one side, heat it up with a weed burner blow torch until it is so soft it will lay flat on a shop floor and put a piece of plywood with some heavy weight on the plywood over the plastic until it cools, you will end up with a large piece of flat plastic.

Showing my pattern with measurements.

Showing my pattern with measurements.

After cutting the plastic to the pattern, heating the plastic and bending it to the proper shape I riveted so it would retain the shape and make it strong. To attach the luggage rack to the metal rack, the luggage rack needed a bracket system that would easily clip onto the metal rack and wouldn’t accidentally come off over rough road. Of course I used plastic barrel to make the brackets. The bracket is a kind of  “Z” shape and the top bracket is a flat piece riveted along the top. They are just wide enough to fit between the two vertical supports on the metal rack and slip over the conduit on the bottom and the horizontal bar at the top. To keep the plastic racks from bouncing off the metal racks, I made a “L” bracket out of plastic, then cut a slot through the back of the luggage rack and “Z” bracket attached on the back. The slot was cut just below the top horizontal cross piece on the metal rack. I attached the “L” bracket with rivets to the luggage rack so that the short part of the “L” bracket will slip through the slot, under the horizontal cross-piece and though the “Z” bracket. The plastic “L” bracket is kind of spring loaded and stays through the slot until you’re ready to remove the luggage rack.

Showing brackets on the back that slide onto rack. Note the slot in the upper bracket for "L" bracket to slide through and secure the luggage rack to the metal rack. Note that everything is riveted and hot glued on.

Showing brackets on the back that slide onto rack. Note the slot in the upper bracket for “L” bracket to slide through and secure the luggage rack to the metal rack. Note that everything is riveted and hot glued on.

Showing "L" bracket that slips through the slot, over the horizontal rack bracket.

Showing “L” bracket that slips through the slot, over the horizontal rack bracket.

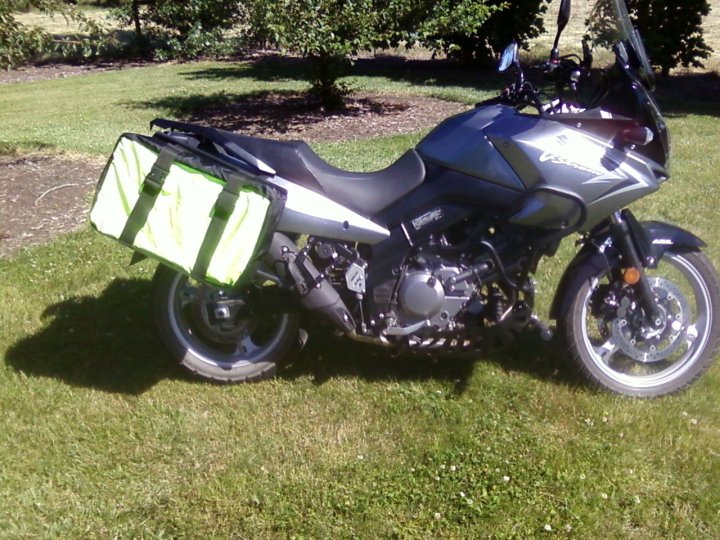
20” carry-luggage is pretty typical and I was able to find one at Goodwill for a $5. The other one I bought a matching one at Walmart for $20. I removed the wheels on the bags and they slipped perfectly into the plastic luggage racks. I added two straps on each luggage rack to hold the bags securely in the racks.

DSCF6914

The carry-on’s looked pretty good, but they weren’t waterproof or dust proof. We had acquired some bright yellow material that school crossing flags are made out of when we owned a screen printing business and I had some left over. Using that and some water resistant material I bought at a fabric store, I sewed together some slip on covers for the bags (see top picture). That’s right, I sewed. Gentlemen, if a sewing machine is not part of your power tool assortment, your assortment is not complete.

I have used the racks and panniers for three years now and they have worked great. They are light weight, durable, flexible, inexpensive and not too bad looking. I never remove the metal racks. They act as rear-end crash bars and have saved my bike from damage more than once.

Anyway…for what it’s worth.

A Better Motorcycle Windshield

Standard

I Love to Ride IN Comfort

DSCF6876

 I love to ride motorcycles. Every time I go for a ride it lifts my spirits and makes me whole. Those of us who ride, ride for our own reasons. I ride for the feeling of freedom and for the thrill. I love corners. There is nothing like the feeling of taking a corner too fast and thinking that you’re about to die and then you don’t. I don’t actually take corners too fast on purpose, but if you ride you know what I mean.

As I get older, I like to be as comfortable as possible when I’m riding. For my V-strom, I made a custom seat that fits me better and gives me better support. When I bought my Volusia with an $800 Corbin seat and I can ride it all day in comfort. My dual sport, Honda XR650L came with a $600 custom heated seat. My hind-end has got the comfortable seat issued covered, so to speak.

Another area that I like more comfort as I have aged is protection from the wind. It puzzles me to see guys running down the highway at 75 mph with ape hangers and no windshield or windscreen. They may look cool, but I know that they are not comfortable. It takes a serious grip to hold on to your handle bars with wind hitting you at 75 mph, not to mention bugs in your teeth and the road debris that gets flipped up and hits you in the face. That kind of riding is not for me.

My stock V-strom windshield is known for not offering good protection and for those of us who are a bit taller, head buffing and wind noise can be a problem. When I bought my Vee I knew that I would be using it for long trips, so I needed to solve the wind issue. After much research I found that I had two choices, buy a bigger windshield or add to the windshield I had. I didn’t want to buy a larger windshield because I use my Vee for dual sport riding and I was afraid that a larger windshield might get in the way in tight trails and would be difficult to see the rough road directly in front of me when the shield got dusty. I decided to add on to my stock shield.

In my research I found an add-on shield that would probably work, but it’s not ideal. The one add-on that I liked was designed to attach to the top section of a stock shield, extending up over the top a few inches. The thing that caught my attention was that it was engineered to catch the wind that was flowing up the stock shield, compressing it, accelerating the wind and shooting up and over your head. I like the concept and the physics of it told me that it would work, so I decided that was the one for me. The problem was that, like I said, it wasn’t ideal. I wanted to add some width to my stock shield too. I’m two foot across the shoulders, so being a homegrown engineer, I went to work designing and making what I thought would be ideal for me.

The first thing I did was cut a pattern out of cardboard. I wasn’t sure what shape would work best, so I cut and trimmed the cardboard until I felt good about the shape. Next I searched my shop and found a piece of plexi-glass that would be the right thickness and size. Using a scroll saw with a fine blade, I carefully cut the plexi to the pattern.

Once I had the plexi shaped and the edges sanded round I heated the plexi with a heat gun and formed it in the curve of my stock shield. I also wanted any wind hitting the new section to be diverted up and over my head as much a possible. To accomplish that, I heated the upper five inches and when it got pliable, I used gloves and a tightly rolled towel to curve the top of the new section forward slightly.

DSCF6866

Showing plexi-glass cut to pattern heated and formed to shape

When I considered how I was going to mount the new section to the original windshield I felt it would be important not to drill holes in the original windshield and to mount it with plastic bolts. I didn’t want to compromise the original shield and I used plastic wing nuts and bolts so if I crashed, the bolts would break and in theory, not the windshield. I figured out how to use two of the screws that held the original windshield for the two top brackets and two screws in the fairing on each side of the windshield for the lower brackets. I made the four plastic brackets out of, say it with me, plastic barrels and bought two plastic bolts with wing-nuts. I carefully marked the new shield so I knew where to drill holes for the bolts in the lower brackets, the four small screws in the upper bracket and carefully drilled through the plexi-glass.

DSCF6862

Showing plastic brackets mounted to bike with factory screws

DSCF6873

Showing new shield mounted to brackets with four small screws and two plastic bolts with wing nuts

After I got the new addition installed and gave it a run down the road, I notice that at 60 mph, or faster, that the plexi-glass compress too much, leaving only a small gap between the two shields. To solve the compression problem I added two medium size suction cups under the upper brackets. With the suction cups in place, the wind could only compress the new shield so far before the suction cup stem stopped the plexi-glass from compressing too much. The nice thing about the plexi compressing some was that the faster I went the smaller the gap between the two shields got and the faster the air flowing between them moved directing it up and over my head.

DSCF6875

The new addition to my windshield worked great. Riding down the road at any speed the new shield completely eliminated the wind hitting my head. No more sore neck from head buffing and the wind noise was cut by at least 60%. The new windshield combination looks unusual or even funky, but I gave up cool for functional a long time ago.

Anyway…for what it’s worth.